Buenos Aires, by Noelia Diaco. Photo is not visible, used only for sharing on social networks.

Seattle: outdoors

May 7, 2013
One of the most exciting parts of moving to San Francisco for me was the opportunity to explore the western half of the country. While Ben had visited 44 of the 50 states, I had only been west of the Mississippi three times: to Texas when I was 6 months old, to San Diego when I was 6 and had the chicken pox and to San Francisco when I was 10. Last month Ben was going to Seattle for work (his company headquarters are there) and I decided to tag along and see Washington state for the first time. (For anyone keeping track, I've now made it to Nevada and Washington. Soon I'll be able to add Oregon to the list — more on that later.)

With Ben at work, I had three days to explore on my own. The first day the rain mercifully held off and I was able to spend most of the day outdoors exploring the waterfront, Pike's Place and the Space Needle.

Seattle was a fun city to photograph

The newest addition to the waterfront, built in 2012.

Pike's Place sign from the back. 
Pike's Place is Seattle's famous public market, chock full of produce vendors, eclectic shops and fishmongers. I took a pleasant stroll through on our first day in town, stopped to enjoy some chocolate-covered cherries and returned the next day for chicken udon and sanctuary from the rain. But when Ben and I went on Saturday, the crowd was so unpleasant that we only stayed long enough to inspect some fresh salmon.
It's been a long time since I traveled by myself. In Argentina, Ben and I never split up while traveling (we did while in Buenos Aires, but we considered that our home). After I'd walked the waterfront and explored Pike's Place, I wasn't sure what to do. If Ben had been there, I might have spent more time tasting the free food at Pike's Place, but that wasn't nearly as much fun without someone to share it with. Instead, I decided to wander aimlessly.

Not far from Pike's Place, I found a plaza with olive oil and wine tastings. I cook with olive and vinegar basically every day but I've never really understood the fuss over fancy olive oil. Indeed, when I first tried the olive oils at the tasting, it was no more exciting than if I had poured myself little bowls of olive oil at home. Fortunately I asked for help and discovered the store's real secret: their olive oils and balsamic vinegars are infused with all sorts of flavors. Garlic, tangerine, blood orange, herbs de provence, lime, cinnamon pear and so on. The secret is in how you pair the two. I brought Ben back on Saturday and we brought home a garlic olive oil, an herbs de provence olive oil and a tangerine balsamic.

Inspired by my success at the olive oil tasting, I decided to give the wine tasting across the way a chance. I figured I could learn more about Washington wines, about which I know little. In Sonoma, a wine tasting costs between $5-$15 and usually buys you five one-ounce pours (though some places are more generous). You're often in and out in about 20 minutes. At this Seattle winery, each pour was at least two and maybe three ounces. The other patrons were basically treating the winery as a bar, sitting for at least an hour chatting with friends. Not wanting to get drunk at a wine tasting (tasting!) by myself, I sipped slowly and enjoyed my book. The wine wasn't that good and the pourer wasn't interested in chatting, but it just reminded me of the number one rule of traveling alone: never go anywhere without a good book (in this case, "The Orphan Master's Son").

Wine tasting behind me, I continued my aimless wandering which eventually landed me at the Space Needle.

The Space Needle and the Experimental Music Project, designed by Frank Gehry.
Built for the World's Fair in 1962, the Space Needle was the highest structure in Seattle at the time at 605 feet. The current tallest building, the Columbia Center, measures 937 feet. Having checked off several major attractions, I headed back to our gloriously comfortable hotel.

Seattle sunset, captured by Ben.
Walking around Seattle, it's hard to miss the preponderance of public art. I didn't photograph nearly all of what we saw, but here are a few pieces.
- Steph

Keep reading ...

How-to instructions: corner photo frame

May 6, 2013
Woot! Check out our awesome, homemade, self-designed corner photo frame.

Months ago, I found this photo online. I saved it and figured, when it came time to decorate, the internet would be full of instructions for how to make it ourselves. But when I decided to tackle this project a few weeks ago, I couldn't find a single instance of anyone who had actually made the frame. All I could find was this no-longer-available photojojo product and a horribly reviewed frame on Overstock.

We improvised. And it worked!

Step-by-step instructions:

I decided not to bother with glass and to make the frame edges out of wood (I also considered using matte board). At an arts and crafts store, I bought four pieces of bass wood, measuring 36" long, 3/8" high and 1/2" wide.

We wanted to mount the frame on the wall between the kitchen and the hallway. The hallway includes a utilities closet so the frame could measure at most 6.5" long on that side. I decided to make our frame asymmetrical to allow for bigger photos on the kitchen side. I taped paper to the wall to figure out the best dimensions for our space.


I used Photoshop to lay out various photos arrangements until we found one we liked. I tweaked the photo sizes slightly from the wall design to make sure I wasn't cutting off any important elements. We picked atmospheric photos from places we've visited, rather than photos of us or simple landscapes. After finalizing all the measurements in the next step, I ordered the photos from Snapfish with a matte finish.

One of the hardest parts was figuring out the exact measurements of the photos and the pieces of wood. For the photos, I included an extra .25" on each side that bordered the frame (that way I could attach it to the frame more easily and had a little leeway if my measurements were off). Here's my cut list for the wood, as well as a diagram showing how it all fit together.

2 - 9.875"
2 - 7.375"
2 - 7"
2 - 6.5"
6 - 5.5"
2 - 5.375"
2 - 4.5"
4 - 4"


It's hard to describe how to measure the wood, but I took into account how the wood intersected at each corner and included an extra 3/8" on the lefthand pieces to account for the overhang where they meet at a right angle.

I measured the wood to the desired sizes and cut it down with a hand saw. Then I stained each piece with Minwax Red Mahogany wood finish.

The other difficult part was assembling the frame given the three-dimensional design (this is where Ben came in). We started by attaching the photos to the wood with glue (and reinforced by tape). We didn't worry about locking the photos into a right angle (especially since our wall isn't exactly 90 degrees) and we didn't attach the five levels together.

The wood is laid out in such a way that the middle frame covers the frames above and below it, and they cover the ones above and below them, respectively (so the middle is the largest in 3 dimensions). That made it kind of a jigsaw puzzle to put together; we couldn't just go top to bottom. A combination of wood glue, paper glue, scotch tape, sticky tack, and multi-arm coordination got it all lined up nicely and securely attached to the wall.

On the left: our finished product. On the right: the inspiration.

- Steph

Lighthouse keepers for a night

May 5, 2013
We're way behind with blog posts over here. Embarrassingly behind. Since our last post, we took a mini-vacation to Seattle, stayed at a lighthouse, hit up all our usual haunts and watched the sun set from the highest point in San Francisco. We even have a new arts and crafts project to share with you. So without further ado, here's our first attempt to catch up, featuring Ben's birthday.

I wanted to plan a surprise for Ben's birthday: a weekend at a lighthouse. The idea for the surprise came from Ben himself, who back in September had mentioned the lighthouse while reading our Northern California guidebook. Fortunately, that's the sort of information I remember and Ben quickly forgets, so I was psyched to steal his idea and surprise him. Except during the planning process, I somehow managed to confuse this lighthouse with this one, and once I got it all sorted out, I realized the lighthouse with lodging was 150 miles away up the coast. With Ben as our only driver, I figured I should let him in on the plan (plus, if it rained, the lighthouse would be nearly impossible to reach and I didn't want to be solely responsible for poor planning).

Ben's birthday rolled around and the sun gloriously stayed out so my (semi-)surprise was a go. We packed up our camping gear, which had been relegated to the closet during the (not very long San Francisco) winter, and boarded the bike. The route? One of our favorites roads: Route 1 (also known as the Pacific Coast Highway).

We've done the stretch of Route 1 between San Francisco and Point Reyes at least a dozen times now. We were making good time so we decided to detour onto one of favorite loops, which like that whole stretch of land, basically consists of beautiful rolling hills (it's remarkable how many photos I can take of these hills).
barn tomales petaluma road cows
Aww, a mother and two baby sheep.

boat bodega bay california
Lunch in Bodega Bay
The real treat began past Bodega Bay, a stretch we had only done in a car. Neither of us remembers anything special about it from our car trip, but on the bike, it was unbeatable.

route 1 pacific coast highway jenner turns
Another major plus: the lack of cars
russian river pacific ocean
Russian River meets the Pacific Ocean and take a look at that road.


These cows were marooned between the road and a cliff.

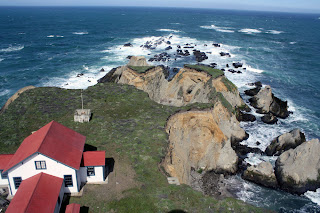
Now I was a little nervous about our lodging. I had arranged to stay in the "Keeper's Room" at the Point Arena Lighthouse. The website description: "Our new Keeper's Room is a fully renovated space including Satellite TV, private bath, small seating area and a full view of the ocean, cliffs and lighthouse — even while laying in bed." But website descriptions aren't always to be trusted (in Patagonia one of our hotels was described as "a warm and comfortable stay" and there was barely room to move).

The first sign that I need not have worried: the view as we approached.

point arena lighthouse
I didn't take any photos of our room, which was nice and cozy. There was a gas fireplace for heating, which was happily running when we arrived. The bed was comfortable and you really could see the lighthouse while lying in bed. It was, however, a bit windy.
point arena lighthouse keepers room
Ben tries not to get blown away.

We got takeout for dinner and enjoyed the sunset.

point arena lighthouse sunset
Included in our room price was unlimited access to the lighthouse. Which brings me to the fact that I haven't mentioned whales at all. One of the reasons I had planned this trip was to see the gray whales that migrate up the coast from Mexico in mid-March. The whole drive up I kept my eyes on the water hoping I might see a whale. I knew this was a long shot, but the internet had led me to believe that there was a good chance of seeing whales at the lighthouse. We had even remembered our binoculars. But after climbing the lighthouse steps the next morning, we peered out onto the ocean and spotted ... not a single whale. And the lighthouse docent seemed very uninterested in helping us with our whale quest. We enjoyed the views, but eventually we had to descend without a whale sighting.
point arena lighthouse point arena lighthouse view
Views from the lighthouse


The first Point Arena Lighthouse was built in 1870 but destroyed in the 1906 earthquake. The current lighthouse, at 115 feet tall, began operation in 1908. It featured a 1st Order Fresnel Lens, over six feet in diameter and weighing more than six tons, with 666 hand-ground glass prisms. The light emitted by the lens was visible to mariners for 20 miles. The lighthouse is still an operational navigation aide today, with the light from the modern rotating light visible for 16 miles.

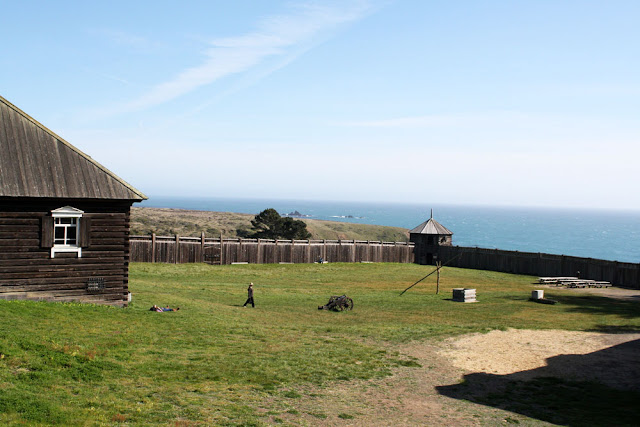
The next day we mostly spent exploring, including a stop at a vineyard near Steward's Point with bad wine but nice scenery and a tour of Fort Ross, an old Russian fur trading outpost. The fort, whose name was derived from the word for Russia, was originally established by the Russian-American Company, which controlled all Russian exploration, trade and settlement in North America. Chartered in 1799 by the czar, the company constructed Fort Ross in 1812 as a California outpost for hunting sea otters and provisioning Alaska operations.

fort ross historic state park
The company's holdings extended as far south as Bodega Bay and more than 200 ships came through the port during its trading years. The fort compound housed living quarters for high-ranking officials, a Russian-Orthodox chapel and storage for food, furs and trading goods. Outside of the fort walls, the settlers built barns, wood and metal workshops, a ship works, tannery, two windmills for grinding grain and Russian-style bath houses.

The Russian American Company sold its holding in 1841 after 29 years on the California coast. The valuable fur seal had almost disappeared, the settlers weren't very successful in growing food and the company was spending more to run than the colony than it was making. The property changed hands several times before becoming a State Historic Monument in 1906. Since then, the fort has been slowly rebuilt to resemble how it looked during its days as a Russian outpost.
cannon fort ross historic state park

fort ross russian trading fur

On the right, the view from one of the watchhouses
We had made reservations to camp at Salt Point State Park, where Ben got to enjoy one of his Christmas presents (a bigger camping pot). We enjoyed another beautiful sunset while searching again (unsuccessfully) for whales. The next morning it was back to San Francisco. Not a bad birthday weekend, in my totally biased opinion.
salt point state park sunset


Where will the road lead next?

- Steph